Vendors Connect. Powering digital distribution with Zapier & Cloudsmith.

At Cloudsmith, we are always looking for new ways to make our customers’ lives easier, more efficient and more highly automated. With this in mind we are extremely excited to announce that we have developed an official Cloudsmith Zapier integration!
What is Zapier?
Zapier is an automation platform that allows you to connect your favourite apps and services together (such as Stripe, Slack, Gmail and more). You can connect multiple apps together to automate tasks and you can do all of this without needing developers to build or code custom integrations - the simple interface is entirely point-n-click driven and is extremely easy to set up.
For example - maybe you have packages on Cloudsmith that you would like to sell commercially. Every time you get payment from a customer through your payment provider (Stripe, Shopify, Paypal etc), you could log into Cloudsmith, create an Entitlement Token in the relevant repository and then share that Entitlement Token with your customer. (For more information about Cloudsmith Entitlement Tokens, see here)
OR - you could automate this entire process with the Cloudsmith Zapier integration!
Let’s work through an example!
Get started by logging into your Zapier account and creating a new “Zap”. A Zap is the name for the automated series of steps between your chosen apps that Zapier will perform.
Open the menu on the left and click “Make a Zap:

Step 1
Choose the app that you want to use to “Trigger” this Zap, in this example we are going to use Shopify:

NOTE - you will need to authorize Zapier to access your Shopify account after clicking “Continue”. This process varies depending on which payment provider / platform you are using, but for Shopify you are presented with a window to log into the Shopify platform and authorize Zapier. Other payment providers work similarly, or offer you the option to add an API Key.
Once you have authorized Zapier, you continue to set up the trigger event, in this case - specifying exactly what order conditions will fire this trigger:

You then test the trigger and it will pull in any orders from Shopify (or sample order data if your Shopify account does not have any paid orders yet):

Once you have this all completed, click “Done Editing” to move to the next step.
Step 2
Click the "+" icon under your Trigger step, chose the Cloudsmith app from the dropdown list, and then Chose the “Action” that you wish to perform - in this case it is “Create Entitlement Token”:

You will need to authorize Zapier to access your Cloudsmith account, and you do this by adding your Cloudsmith API Key, which you can retrieve from here

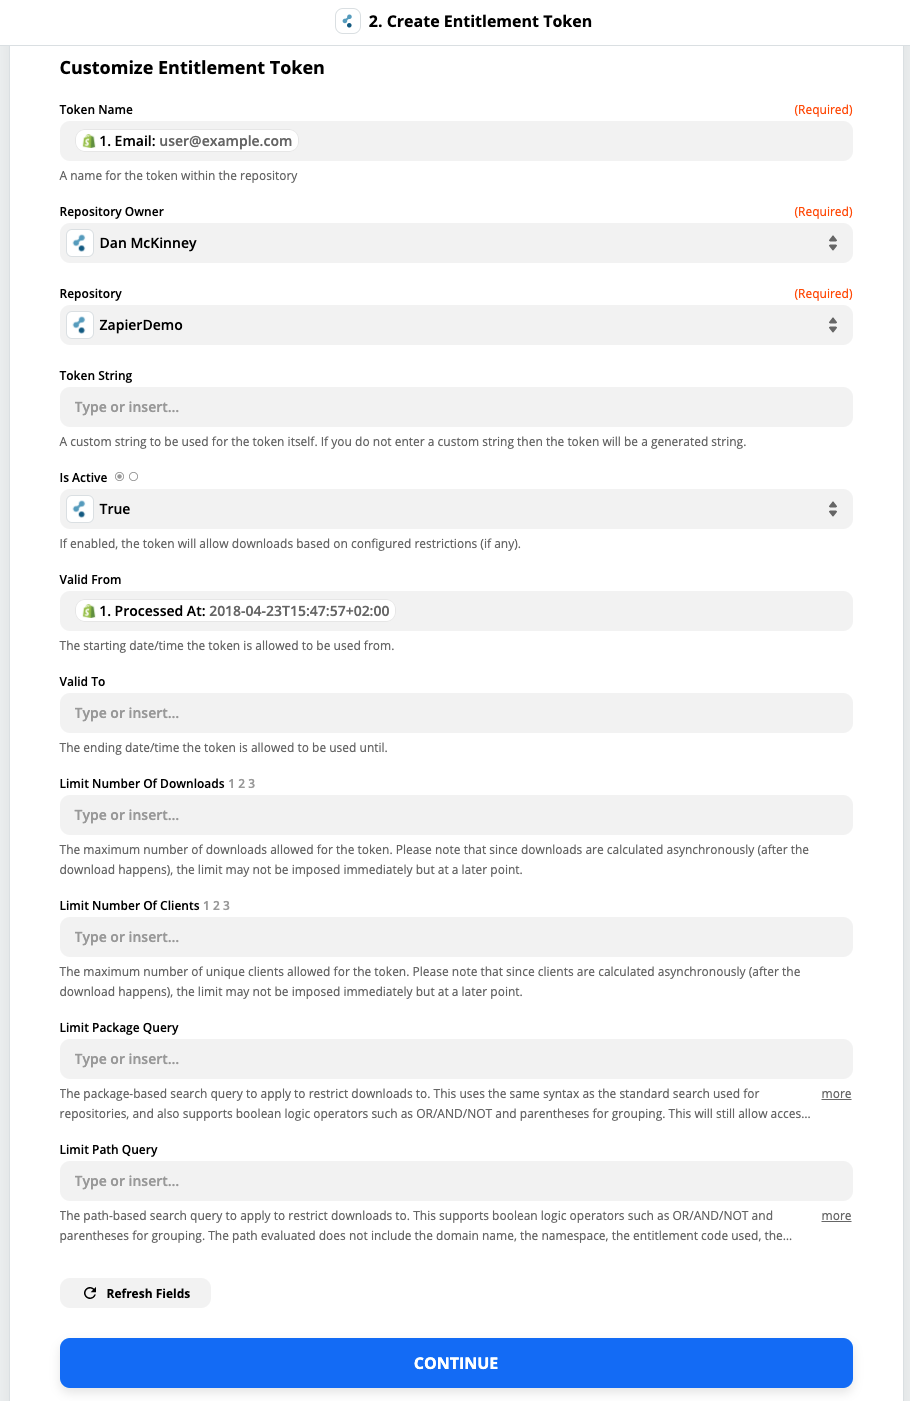
Once you have entered your Cloudsmith API Key you then specify the details of the Entitlement Token that you would like to create. The only required fields are:
- Token Name
- Repository Owner (namespace)
- Repository
You can enter a Token Name manually or you can pull in output from your initial trigger step (such as an email address, customer ID or other identifying information from your Shopify order). For the Repository Owner and Repository you can select from the dropdown menus. In addition, you can specify a custom string for the Token itself (although if you don't then one is generated for you!)
You can optionally specify any restrictions you would like associated with this Entitlement Token, such as an allowed number of downloads or a valid to/from date.

In the example above, we will use the customer email address from the Shopify order as the Token Name, the order placement date as the Token Valid From date, and we will limit the number of downloads to 10.
You can then click “Continue” to test and review your selections, and then click “Done Editing” to complete this step.
At this point, your Zap is now set up to create an Entitlement Token in your specified Cloudsmith Repository for every complete Shopify order that you receive.
If we now create an order in Shopify, and then check the repository that we specified in the “Create Entitlement Token” action, we can confirm that the Entitlement Token has been created, with the details from the Shopify order:

You may wish to add an additional output step to the Zap that could, for example, email the Entitlement Token to your customer directly or maybe use an additional Zapier app to integrate with your chosen mail or CRM platform - This would enable you keep a track of Entitlement Tokens so that you can automatically disable them using the “Disable Entitlement Token” action in the Cloudsmith Zapier integration (perhaps if a customer unsubscribes or cancels)
We hope that this demonstrates how simple it is to automate a payment and token creation workflow for a Cloudsmith repository. There are many integrations available on the Zapier platform and we are pleased to be able to offer this official Cloudsmith integration as an option for our customers that use the Cloudsmith platform for distribution. As always, if you need any help, guidance or additional information please just contact us and we will be happy to work through it with you!
Happy order processing! :-)
More articles


Introducing Cloudsmith For CocoaPods

Getting Started with CocoaPods and Cloudsmith

We’re Making The Cloud Faster With Local Storage And Edge Caching

Did We Lose Something With The Adoption Of Containers? And Can We Get It Back?
